Well, this one will be short and sweet. I recently had the opportunity at a friend's birthday party, to gather a couple of suggestions for what I termed "alternative" Holiday cookies. Just a little change, variations on the usual stars and reindeer. Not many people at the party were into the idea, but the ones who were came up with some drawings that were just what I was looking for. I traced their drawings onto a thin piece of plastic sheet, and cut them out, making both a form to cut the cookie, and a template drawing from which to copy the details in icing later. This is how I do a lot of my designs.
There were four designs that made it into finished cookie form-- three are represented here, one was a little too naughty for me to feel comfortable posting on this Family Friendly blog. Not really dirty, but I don't want to give anyone the wrong idea about the tone of Strange Cookies. It was funny though, and made us giggle.
The first cookie was designed by the Birthday Girl's three year old daughter, Maggie Sage. Maggie draws excellently, and is crazy about kitties. The next was designed by our friend Bill, who first met me way back in my bakery days. We've cooked together a few times, and I loved his idea for the Asian pear. I did my best to represent the spots and squiggles from his Sharpie-marker-drawn cartoon. This was a strange cookie after my own heart.
The last cookie was designed by my sweetie, Ken. It is a Holiday Rocket, or, as Ken suggests, a Christmas Bomb. Either way, I like it. I've been known to hang little monsters and spaceships on a Christmas tree now and then, so again, right up my alley.
The icing on this one exhibits some bloom as a result of being transported in the car when it was 7 degrees outside. (Yes, I said 7 degrees. Yes, Fahrenheit. It was COOOOLD.)
It was fun interpreting these drawings into cookie form! I have lots of ideas of my own to explore in the New Year, but this seemed like a good way to enter into the holiday baking season. By the way, Maggie and I also cut out stars and reindeer and Christmas trees from the yummy Lemon Cookie dough (I made it with white whole wheat flour). It was a great party.
I've had a lot of exposure to bread baking in my life, and over he last year or so have worked it into my regular routine. Frankly, it is better to do the work and have the good stuff around than to be without it. Ken and I have jokingly termed store bread as "bread substitute". Our morning toast routine revolves around, and is enhanced greatly by Professional Strength whole grain ciabatta style rolls, toasted, split, and toasted again. We keep them in the freezer and pull them out as needed. I do my best to not overbake them for the most perfect toast or sandwich experience. (Twice toasting helps both to thaw for slicing and to prepare the crust for a lovely crunchiness.) I also press the dough out thinly enough to make rolls that fit in a wide slot toaster without first slicing. I have used many different methods, some more elaborate than others to prepare the dough for my House Rolls (wedges), but the same basic core of ingredients. I would like to begin with the basic formula and method. This incorporates some basic techniques which do a lot to further the skills of anyone with an interest in bread baking.
Kate's Multigrain Ciabatta Wedges
1 packet dry yeast (not the rapid rise kind) 1 T honey 3c. warm water (temperature should not exceed what feels comfortable on your wrist)
proof until foamy
add 3 c. high gluten bread flour (try to get an unbromated kind. I like King Arthur flour)
Beat vigorously until gluten begins to develop. I beat it about 400+ strokes with a wide wooden spoon. (Allow yourself to take breaks, if you need to. Remember: this is worth it.) Then beat in:
1 c. of rye flour, cover, and let rise at least 30 min. (The longer the better. This stage can extend from 30-40 minutes in a warm place, to overnight in a moderately warm to cool spot.) It's best to get it nice and bubbly, and doubled in size. add to sponge:
2 c. ground oats (rolled oats ground in food processor) 2 c. buttermilk 2 eggs
If there's time, let it rise more. Otherwise proceed:
1 1/2 T salt (sea salt) 1/2 c. wheat germ 3 c. rye flour approx. 4-5 c. whole wheat flour mix, and then knead together. (Add the flour a little bit at a time, at first a cup at a time, then less as the dough gets stiffer.) Eventually just stick your hand in there. It's going to be messy. You will be scrubbing the dough off later. Just get in there. This dough is a bit sticky with whole grain starchy goodness held together in a web of gluten developed in our sponge. Beating with the paddle earlier saves on kneading time later, I've found. It's important to allow a nice whole grain dough to be a bit wetter than perhaps one's instincts might dictate to allow the freshly added flour to swell slightly during the next resting period, and to give a moister freshness to the baked product.
At this point, you will be adding a little flour at a time to the dough, and folding and pushing the dough itself to knead the flour in. I find that one hand helps to keep the dough in place, while the other does the bulk of the folding and pushing. I switch off sides, and sometimes use both at the same time. Again, the dough will still be a bit sticky when done, but you will notice more and more the tendency of the dough on your hand to want to reattach itself to the rest of the ball as it reaches its finished stage. Sometimes I take a scrub break if my hand is too sticky. (Having a nail brush around the sink is really helpful!)
When the dough has received its full quantity of flour, it's time to let it rest again before shaping and baking. This time, I sprinkle flour on a tray or one of the baking pans, plop the dough on it, and cover it with plastic, either commercial plastic wrap, or a plastic shopping bag. (I use plastic shopping bags for a lot of stuff. I'll slit the side with a pair of scissors to make more of a flat sheet.) The point is to keep the outside of the dough moist. Before plastic wrap, thin moistened cotton towels were used for this purpose. Professional bakeries were (and are) equipped with a room or a small cupboard with a high humidity and warm temperature to proof (raise) the dough. The act of letting the dough rest and swell is referred to as "proofing". At this stage, we want the dough to proof in ball form until it fails to bounce back when poked with a finger. When you get a pronounced belly- button looking dimple that just sits there, your dough is ready for the next step.
When the dough has proofed to your satisfaction, divide it into 3 or 4 pieces, depending on how much you feel comfortable dealing with at once. For this size batch of dough, I usually cut it in thirds, and after flattening one of those pieces with my hands or a rolling pin to about a 1/2 inch thickness, cut that piece into 12- 15 individual pieces. (My picture may be a larger piece of dough, stretched to fill the entire tray. I've taken a lot of pictures of different batches of dough. Those are also some pretty big pieces I've cut it into!) It really is up to you to choose how large to cut your wedges. I've cut them different sizes for various needs. Make little bitty wedges for a dinner party, or bigger ones for breakfast toast or sandwiches.
After cutting the wedges, it's time for the final proofing before baking. This time the baking pans get sprinkled generously with flour (no greasing). Also, sprinkle the tops of your dough wedges, and then transfer them to the baking pan, spaced at least an inch apart. Now you're going to cover with plastic again, and let them rise until they once again fail fail to spring back when poked with a finger. When they've risen to that point, put them in a 350 degree oven for about 30 minutes, switching the pans around about halfway through. My system is to start working the next ball of dough when the first one goes into the oven. Brown lightly on the bottom (turn one over and check.) Cool on a rack, and wrap it up in plastic ONLY after it's cooled completely. If you don't have time to cool it completely, (before, say, going to work, or to bed), put in a papr bag, and wrap it up later. Warm bread in a plastic bag tends to get soggy from residual steam and condensation.
click here for slideshow documenting above process
The part of this process that I want to highlight in Strange Cookie Form is the initial Proofing Of The Yeast. This is where it all begins. If there's no action here, nothing will happen later, no matter how hard you try. Use live yeast, warm water, nice honey or some other sugar food to give the yeast incentive, and you're in business.
I won't sat that there is no work at all involved in making bread. There is. I've had the opportunity lately to use some commercial mixers in the process as well, which helps, but needs a little adapting to. My experience is that with a little practice, and knowledge of the science of breadmaking, as well as just having experience with the nature of the beast, making decisions about what to do at various stages of the process can be the easy part. However, just in case my Dear Readers might need it, I've included a video to illustrate what might happen if things go wrong................
I haven't forgotten the other recipes I've promised. I'm feeling a new batch of homemade pasta coming on. (Mmmmm, ravioli!)
Frank Zappa once asked, "Do you like monster movies? I looove monster movies." He then went on to describe a particular monster movie and its cheezy production, before cranking into the song "Cheepnis". (This is from the album "Roxy & Elsewhere", a collection of hot live performances from 1973-4. Wanna listen? Click here. Note: this is an audio-only presentation on YouTube.)
Well, I too love monster movies, and I looove Frank Zappa as well. Apparently, it was a Halloween tradition for him to play a Halloween show, which must have been the most fun a person could have at the time, if you like that kind of thing. (Apparently the tradition lives on with his son Dweezil and the band ZappaPlays Zappa.) I've chosen, with much encouragement from Ken, who is the REAL Zappa fan (scary) to commemorate Frank Zappa's contribution to, well, many things in our life. He's definitely contributed to my own madness, and continues to do so, as evidenced here. In addition to the cookie, I'm including a live performance of a great Zappa guitar number, Watermelon in Easter Hay.
If you want to see more stuff, YouTube has a number of juicy offerings, one of which is a BBC documentary from 1992, Jazz from Hell. Also, check out Zappa.com. (You can hook up to "Zappa Radio" through this site.)
I've also chosen to pay homage to some monsters who have recently crossed my path, and with whom I'm pretty sure Frank Zappa would be glad to share company. The first of these is a classic. In 1932, Boris Karloff starred in the original version of The Mummy. This is quite a different role from that of Frankenstein, a recent success at the time this film was made. The mummy Ardeth Bey is a speaking part, and for a few minutes appears to have a chance with the girl. Alas, he is too creepy.
The next strange cookie is fashioned after the Brain from Planet Arous, a giant criminal alien brain set on taking over the world. Here is a link to a more complete synopsis of the film, and if that does it for you, here is a link to watch the movie itself. It's a real hoot to watch the brain bounce through the air on a wire. Sometimes I prefer the bad special effects to the good ones!
Speaking of bad special effects, the last movie monster I've chosen to immortalize in Strange Cookie form is a classic of cheap science fiction cinema, Robot Monster.
Considered to be second only to the great (and awful) Ed Wood classic, Plan 9 From Outer Space, this movie has it all, plus a bubble machine. Watch as Robot Monster picks his way through a field, trying desperately not to step on anything. Be amazed at his subtle manipulation of the rabbit ears antenna as he tunes in his magical space TV to get a better look at the human woman's breasts. Amazingly, the man who played Robot Monster in the film went on to make quite a career for himself in a gorilla suit. I can only speculate, as he was terrible in this movie, that he came with his own suit. The director of this movie attempted suicide after its release, not, as it was rumored, because it was so bad, but because he got screwed out of his cut of the money by the film's distributors. Oh yeah, the original release of this movie was in 3-D! (We saw the 2-D version.) For a more complete synopsis, click here. To watch the movie itself, click here. (The movie link I've included was posted in kind of a TV show format, so if you can sit through, or skip through, the little comedy sketches, the whole movie is there. I don't think it would be that hard to find this movie if that doesn't do it for you.) If all this excites you beyond belief, or if you just want to buy the T-shirt and skip the movie, check out this cool site I found.
And finally, I want to mention that a hugely important election is coming up on November 4th, and I urge EVERYONE to get out there. (There is a website devoted to a national pumpkin carving campaign in support of Barak Obama, Yes We Carve. Check it out. I've decided to contribute a strange cookie to the cause.
And a note to all my friends: you can't really vote twice. I'm just trying to be funny. Let's all hope for a smooth and fair election. Wouldn't that be nice?
COMING NEXT: a lovely whole-brain, uh, I mean whole-grain bread recipe. Mmmmm!
I have a fond memory from several years ago of cookie baking at Christmas with a fellow catering coworker. We each chose several goodies that we wanted to bake for gifts, then baked in quantity, and split up the results so we each had some of everything. We made some great stuff! One of my favorite things was a lemon cookie recipe that I got from an old cookbook that belongs to my stepmother. The book came from her grandmother, and had many wonderful old-fashioned cookie recipes to draw from. The recipe that I'm referring to is a lemon cookie that is meant for rolling out and cutting. I remember that I made lovely small bite sized diamond shaped cookies with scalloped edges, and iced them with a simple powdered sugar/ fresh lemon juice combination.
Lemon Snaps
2 1/4 c. flour 1/2 tsp. baking powder 1/4 tsp. salt 2/3 c. butter 1 c. sugar 1 egg + 1 extra yolk 2 T lemon juice 2 tsp. lemon zest
Icing:
2 Tablespoons fresh lemon juice 1 cup powdered sugar
To make the cookies:
Sift together flour, baking powder and salt. Cream butter and sugar, add egg and extra yolk and beat until fluffy. Add lemon juice and zest, and mix. Add dry ingredients and mix until well combined. Chill until firm, roll, cut and bake at 375 degrees Fahrenheit until lightly browned on the bottom (lift one gently with a spatula to check doneness.) Again, I'll guess that these cookies will take about 8-10 minutes, but always watch them carefully and check for doneness. This type of cookie is easy to overbake. Of course, it will be delicious regardless, but it is at its best both in lemony taste and pretty appearance if not allowed to brown up too much.
To make the icing:
Put lemon juice in a bowl, add powdered sugar, and stir until smooth and a bit creamy. Adjust the thickness/ thinness of icing by adding small amounts of either juice or sugar. You may need to try it on a cookie or two to judge whether it needs adjusting at all. ( This icing is also good on the Basic Rolled Cookie. I plan to post a more detailed discussion of icing recipes and methods.)
When thinking about how to shape lemon cookies, the obvious choice is, of course, a lemon.
Actually, I've already done a lemon shaped cookie in the kale soup recipe. It is more fun to know that the cookie will taste like a lemon as well as look like one! To truly qualify as a Strange Cookie, however, one needs to exercise a little more imagination. My next obvious choice was a can of furniture polish.
The Ford Edsel was a popular suggestion from the peanut gallery, but my featured strange cookie is a Volkswagon Rabbit modeled after an ex- boyfriend's car that haunted my life for several years in the late 80's- early 90's.
I think people either loved their Rabbits, or hated them. I'm not sure why the boyfriend who owned the Rabbit I'm speaking of loved his so much, but his love inspired the sinking of many paychecks into the Rabbit's cause, with very little return. Oh yeah, some of this inspiration was fueled by the Repair Your Own (enter name of Volkswagon product here) literature available for starry- eyed wanna-be weekend mechanics. Sadly, these projects seldom ended well at our place.
Apparently, Volkswagon has a new Rabbit to offer the world. I doubt that the floorboards will rust out as readily as those in the older models were purported to do, but who knows? I do know that I enjoyed eating this cookie. All the lines were drawn with a chocolate/ lemon buttercream, mmmmmmmmmm!.
I'm currently testing my bread recipe before sharing it. I'd love it if anyone wants to try these recipes and leave comments-- anyone can.
Well, the long hot summer has really ended, and some appropriate baking weather has returned to the Midwest. Here in St. Louis, the summer can be particularly hot and humid, although this summer was relatively bearable. I did suffer through a little bit of bread baking, but anything requiring butter to be in a non-liquid state seemed to be right out of the question.
I'm currently putting together a bread recipe to share with plenty of pictures and few strange cookies thrown in. I'm also preparing a pasta dough, (or. as I like to call it, noodle dough.) But first, I'd like to invite readers to check out another blog I've been involved with, which is also inspired by noodles.
The blog is called Macaroni Salad. Hence the photo of my representation in cookie form of said macaroni salad. I'll confess that I tried to achieve a tubular dimensional effect on the macaroni by scratching into the icing which sometimes yields me desirable effects. Sadly, this time I failed miserably (well, that might be a little harsh.) They tasted great, and got gobbled happily up by myself, Ken, and some friends. I then realized what I was doing right. My main goal is that as I get better at this, the cookies remain appetizing, whether they come out right or wrong. I wanted to redo this batch of Strange Cookies because it didn't seem to fulfill my notion of what I wanted it to be (oh yeah, I forgot to make the celery) but then I came to the conclusion that it was funny enough to me as is. I did make cookies that look like little chunks of hardboiled egg. I think that's funny! And they were delicious to boot! (To get the recipe that inspires the cookies, check out the blog.) That's what the Macaroni Salad blog will also emulate, I hope. The idea that stuff doesn't have to bound in by our ideas, even if they are good ideas, and that the process itself, and the inspiration behind it, are all part of the end product. I hope you enjoy it.
Oh yeah, I've started the pasta recipe post already, and that will be ready soon. I made the cookies at the same time as the Macaroni Salad cookies, and was really pleased with them. I look forward to sharing. I have several things in states of partial readiness for viewing and reading, so I really look forward to this Fall, and the baking to be done.
Don't forget to check out what happens when Ken and I put our noodles together: Macaroni Salad.
Although I live in a small apartment, I manage to be an active gardener. I have some small borders of perennial flowers in the front and back of the building, and a container garden that stretches about 2/3 the length of the yard in the back. I've mulched around the containers for a couple of years, and last year decided to plant in the ground surrounding the containers. I ended up with an interesting, multilevel collection of flowers and vegetable plants that I harvested and then let go to seed. As I watched the volunteer seedlings just starting to come up early in the spring, as well as planting the beginnings of this year's attempt at a crop of salad greens and peas, I also happily admired the robust development of a lone kale plant. I harvested a healthy bunch of it one Sunday and made a large pot of soup. Like this: Kale and Cannelini soup with Fennel
2 onions, one large and one small 3 stalks celery 4 carrots 1 whole head of garlic 2 fennel bulbs (finocchio, or often called anise)
1 pound of cannelini beans, dried (sort, rinse, cover with water, boil for 2 min. then turn off heat and soak one hour. Drain, rinse if you like, cook until done. The cannellinis cooked pretty fast, half an hour or so.)
1 bunch of kale (lacking this, swiss chard would be lovely)
juice of 1 lemon
3 quarts HOT liquid ( you could use hot stock, maybe toss in some wine--if you do, cook off the alcohol first, then add it hot. I used plain boiling water and then added about 1/2 cup? of Bragg's liquid aminos. An unromantically named product which makes soup delicious and nutritious with little or no need for extra salt. Like vegetarian bouillon in a bottle. Definitely better than it sounds...)
To begin, chop all of the vegetables. Heat some olive oil in a large cast iron skillet if you have one, or in the soup pot itself if the bottom is heavy enough to let you slowly cook the onions and the basic soup vegetables without scorching or browning too much. I usually use my cast iron skillet to begin, and then transfer the contents to a soup pot, adding the hot liquid, cooked beans and or grains, and any tender vegetables like leafy greens or green beans. That said, begin with the onions, and saute over a medium heat until soft and translucent. Add the celery, and cook until it's heated through, and the color begins to deepen. Adjust the heat as necessary to keep the pan of vegetables cooking through the addition of cold vegetable ingredients, but not so high as to scorch them. Our goal is an even sort of medium sautee, active cooking but slow enough to soften and carmelize our vegetables a bit, particularly the onion, celery, carrot combo. Add the carrots, heat through, then add the fennel bulb. Cook until the carrots and fennel are softening.
"But what do we do with the garlic?", you ask. Well, I feel that it can be added at any stage in the sauteeing process that you prefer. When I made this soup, I added it after the celery so it would have time to sautee in the oil, but wouldn't stick and burn while the onions carmelize. That's what I do.
So, at this point, do what I described earlier, and have your stock/ liquids hot and standing by, preferably in your large soup pot! Combine sauteed vegetables, cooked beans, and chopped kale, then bring to a simmer. You only need to simmer it to combine the ingredients and make sure everything is thoroughly cooked. Don't boil the soup if you can avoid it, but it really won't be the end of the world if you do.
Add the lemon juice (more to taste if you like), check the salt, and add some black pepper. Eat it now or later, or now AND later, more likely. It will be good now, and better later. That's the nature of soup.
This soup would be great with a variety of vegetable and bean substitutions: swiss chard and navy beans; spinach and chickpeas; collard greens and white northern beans! Try zucchini added at the end of the sautee process, or pole beans, or both. If you lack the fennel bulb, increase the celery and carrots. A person could spin this basic light brothy soup into a variety of summer and fall soups. Use potatoes instead of beans! Toss in a bay leaf or two with the onions at the beginning, and a handful of fresh basil at the end. The possibilities are truly endless........
Our featured Strange Cookie: the fennel bulb. These are made from whole wheat sugar cookie dough (see Basic Rolled Cookie recipe). I really like the minimalist approach with the icing. I'm very fond of this batch of cookies. Oh yeah, and they were delicious!
Yeah, that's right. Fried Oreo cookies. Batter dipped, deep fried...... that qualifies as a Strange Cookie in my book. I found this recipe while browsing one day. Although I will never make this particular delicacy myself, I thought it very well done, with lots of pictures, and a sprinkling of humor (note: DO NOT test the heat of your frying oil by sticking your finger in). Check it out!
The letter "F" apparently also stands for "F- cup", so for all you ladies looking for a little enhancement, trust the Japanese to find a way to control where those cookies go after you eat them! Check it out, if you dare (there are some other strange products to look at when you get there.) Of course, some might contend that if you eat enough fried oreos, you'd get the same results, but with much less control over where the increase in size might happen.
Last, but not least in this Internet Surf Special edition of Strange Cookies, the strangest and most beloved of all cookie-obsessed characters would like to have the last word (or letter, as the case may be....) Be back soon with more recipes of my own!
I would like to tell the tale of the Huge Potato. Once upon a time, ok a couple of weeks ago, I received a couple of potatoes from a friend of mine. Not unusual, I am often the recipient of extraneous vegetables. I love it. These two potatoes were truly the largest that I have ever had in my possession. The biggest of these is pictured here.
My boyfriend Ken suggested that I make a twice-baked potato out of it. I thought it a grand idea, and set out to do just that. First, I baked it for about an hour at 350 degrees Fahrenheit, then cooled it, and put it in the fridge overnight. In the morning, I assembled the ingredients pictured here: some red onion, garlic, parsley, nice plain yogurt, cheddar cheese, salt and pepper. I put the onion, garlic, and parsley in the food processor, chopped it a bit, and followed it with the potato, yogurt, cubed cheese, salt and pepper. I processed it until properly amalgamated, and returned it to the potato shells. I then tossed it in the refrigerator and went to work.
In the evening, I put the Colossal potato back in the oven at 375 degrees F. Again, I think it was about an hour, and I turned up the heat for about the last 10 minutes to 400 degrees to get that good browned quality that brings such joy to the senses.
We demolished the potato.If you're curious about the liquid refreshment we chose to accompany our potato, click here.
Of course, a person could easily substitute normal sized baking potatoes, and the recipe would work fine. But........... why?
This is the same recipe I've used since I was a kid for those occasional fun holiday cut-out cookies. I've now made both a regular unbleached all purpose flour and a whole wheat version. Both work well. I think I like the whole wheat better for taste and aroma. (It makes the butter even more buttery!) I like the way the paler unbleached white flour makes the milk bottle cookie pictured here so, well, milky looking! There is also a whole white wheat flour more readily available these days that is good to use for pastries. I'll be trying that, also. And now, on to our regularly scheduled recipe...
Basic Sugar Cookies
Cream: 1/2 c. unsalted butter 3/4 c. sugar
Add: 1 egg 1/2 teaspoon vanilla
Beat well.
Add: 1 T cream or milk
Sift together: 1 1/2 c flour (unbleached All-Purpose, Whole Wheat, or any mixture thereof) 1/4 teaspoon salt 1/4 teaspoon baking powder
Optional: nutmeg, cinnamon, or other sweet spice (not pictured)
Stir into the butter mixture until well blended. Wrap up and chill until firm. (Make ahead for the next day-- great.)
When it's time to bake, set the oven at 375 degrees Fahrenheit, roll out dough, cut into desired shapes, place on lightly greased pan, or pan lined with baking parchment. Bake until golden (look at the bottom of the cookie if you can to determine doneness.) My recipe says about 8 min. but I'll be honest that I haven't done a good job of timing this. I suspect it may be a little longer, but be sure to keep a close eye on them. I'll amend this with a more proper baking time later.
COMING SOON-- The Lemon Cookie and the Chocolate cookie
I'm working on getting the cookie recipes together, as well as a couple of other goodies: a soup, and a bread recipe I've been playing with all winter. I'm presently knee deep in broth, butter and flour. I also found myself a real decorating kit with bags and tips. Don't expect things to get too cute or flowery, however. I'm a bit of a minimalist at heart. Expect the unexpected...!
Although there are no new offerings of my own, I do have a strange cookie to share. Apparently, Step 1 to making this cookie involves learning to crochet, which I probably won't ever do, but I find Step 2 rather entertaining. The human mind is capable of such invention in the service of good, evil, and, uh, other stuff.....
Well, I've finished the maiden pan of cookies. I've learned a few things along the way, like, oops, don't actually have any decorating tools. I went to the grocery store and bought the little tips they sell to screw onto premade cans of icing, and rigged up a decorating bag by making a tiny hole in the corner of a sandwich bag and sticking the tip through that. It worked better than I thought it would (secret... little tiny hole.)Since I was working with tiny amounts of icing, it was OK. Some of the cookies were decorated by painting directly with the food coloring like watercolor. That has some possibilities, although I am a little grossed out by the food coloring. I'd like to spend some time thinking about some of the more natural food-based color options. But really, sometimes a person just has to do the thing, and get on with it.
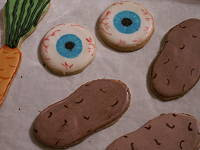
In case it isn't obvious what these cookies turned out to be, we have carrots, eyeballs, potatoes, a couple of short screwdrivers, and a pocket-sized pack of tissues. Oh yeah, and the cookie left intentionally blank for layout purposes. My pick of the bunch for our Featured Cookie is the pocket-sized pack of tissues. This cookie combines a natural coloring agent (cocoa), simple design, and off-the cuff strangeness in just the right combination. I'm pleased so far. I think it may be the only cookie of its kind in the world, and I'm pretty sure that it will not last long. (mmmm, tasty.) Oh yeah, these cookies are definitely meant for EATING. Wouldn't this be a nice design to comfort someone you know who is going through a rough spot in their life, or needs a snack for a long sad movie?
The cookie itself is a basic sugar cookie made from the same recipe I used when I was a kid for cut-out Christmas cookies. I added a little bit of nutmeg for niceness. I'll include some recipes soon.
I have a lot of ideas. I know this is a widespread problem, and that I am not alone.
A lot of my ideas are about cooking. I love to cook. I have had some professional experience, and do from time to time cook-for-pay, but mostly, I like to cook for myself and loved ones. I have been vegetarian for 18 years, and have delved into many styles of cooking from around the world, as well as just putting together my own dishes from my growing knowledge of basic techniques and my own crazy ideas.
That's another thing-- my crazy ideas. Sometimes I think, "no idea too crazy!" and really believe it. A little later, my internal editor weighs in with an opinion. Judging by some of the projects I've had my hand in, I have a permissive editor.
The idea that gives this blog its name has been kicking around since my days as an art school nerd who worked at a wonderful (now departed) family bakery. I've always thought it would be fun to make various odd, unexpected, or incongruous images in cookie form. This past Christmas the idea surfaced again while making cookies for my friend Cindy's catering business. They were snowflakes, with blue and white icing, and silver baubles. I couldn't help but think about my ideas for cookies that look like raw pork chops, or lightbulbs.
I also have serious ideas about cooking, and an interest in sharing some of what I've learned about cooking in general, vegetarian cooking, and bread baking.
My plan is to periodically feature the aforementioned Strange Cookie, with recipes and pattern suggestions to boot. Live vicariously, or try your own hand at making something.

 I traced their drawings onto a thin piece of plastic sheet, and cut them out, making both a form to cut the cookie, and a template drawing from which to copy the details in icing later. This is how I do a lot of my designs.


 The icing on this one exhibits some bloom as a result of being transported in the car when it was 7 degrees outside. (Yes, I said 7 degrees. Yes, Fahrenheit. It was COOOOLD.)


